
Introduction
Do you find yourselo much time managing your machine-learning tasks? Are you looking for a way to automate and simpli? Airflow can help you manage your workflow and make your life easier with its monitoring and notifications features. Imagine scheduling your ML tasks to run automatically without the need for manual intervention. Imagine being able to view the status of your workflows and tasks in real-time and being able to make changes on the fly.
In this blog, we will provide an end-to-end guide on how to use Airflow for machine learning tasks. We will cover the installation, how to create a DAG, how to define tasks, how to set up dependencies between tasks, how to start its web sers and SLAs (Service Level Agreements) for your tasks. Whether you are new to Airflow or an experienced user, this guide will provide you with a comprehensive understanding of how to use Airflow for machine learning tasks and will take you through the complete process of setting up Airflow for monitoring and alerting machine learning tasksof it, you will be able to create a monitoring and alerting system using Airflow’s notification, and SLA features all by yourself.

Learning Objectives
- Understand the basics of Airflow and its use in machine learning tasks.
- Learn how to create a DAG (Directed Acyclic Graph) for machine learning tasks.
- Understand the importance of notifications and SLAs in monitoring machine learning tasks.
- Learn how to set up notifications for machine learninand slack.
- Learn how to set up SLAs for machine learning tasks.
- Develop the a
- Learn about customizing notifications and SLAs for your tasks
This article was published as a part of the Data Science Blogathon.
Table of Contents
- What is Airflow?
- 1.1 How can Airflow be used for machine learning?
- What is a DAG?
- Step-by-Step Guide
- Install Airflow
- Initialize the Airflow database
- Create a DAG
- Set up the dependencies between tasks
- Running the pipeline
- Start the Airflow web server
- Airflow Notifications Basics
- Why do we need notifications?
- Notifications Levels
- Notification Triggers
- Custom Notifications
- Airflow Notifications: The Key to a Smooth Workflow
- Email Notifications
- Slack Notifications
- Airflow SLAs: Staying on Track and Meeting Commitments
- Conclusion
- Additional resources for learning more about Airflow
What is Airflow?
First off, let’s define what Airflow is. Airflow is a free tool that helps you automate and manage your workflows or data pipelines. It allows you to create and schedule workflows, which are a set of tasks that need to be executed in a specific order. With Airflow, you can easily automate repetitive tasks, such as data extraction, transformation, and loading. This can save you a lot of time and effort, as you don’t have to run these tasks manually every time.
Airbnb first developed the concept of airflow in October 2014. They made airflow to manage their increasingly complex workflows. Later the project joined Apache Software Foundation’s Incubator program in March 2016, and the Foundation announced Apache Airflow as a Top-Level project in January 2019.
Airflow is easy to use as the tasks or the workflows in Airflow can be written using the python programming language. It is widely used in various fields, including data engineering, ETL, and machine learning. In machine learning, Airflow provides an easy way to automate ks often associated with building and deploying machine learning models.
How can Airflow be used for Machine Learning?
Airflow can be used for machine learning tasks, such as data preprocessing, model training, and model deployment. It helps to execute the tasks in the correct order and ensures that one task is completed before another task. It also provides the option of retrying tasks if they fail.
What is a DAG?
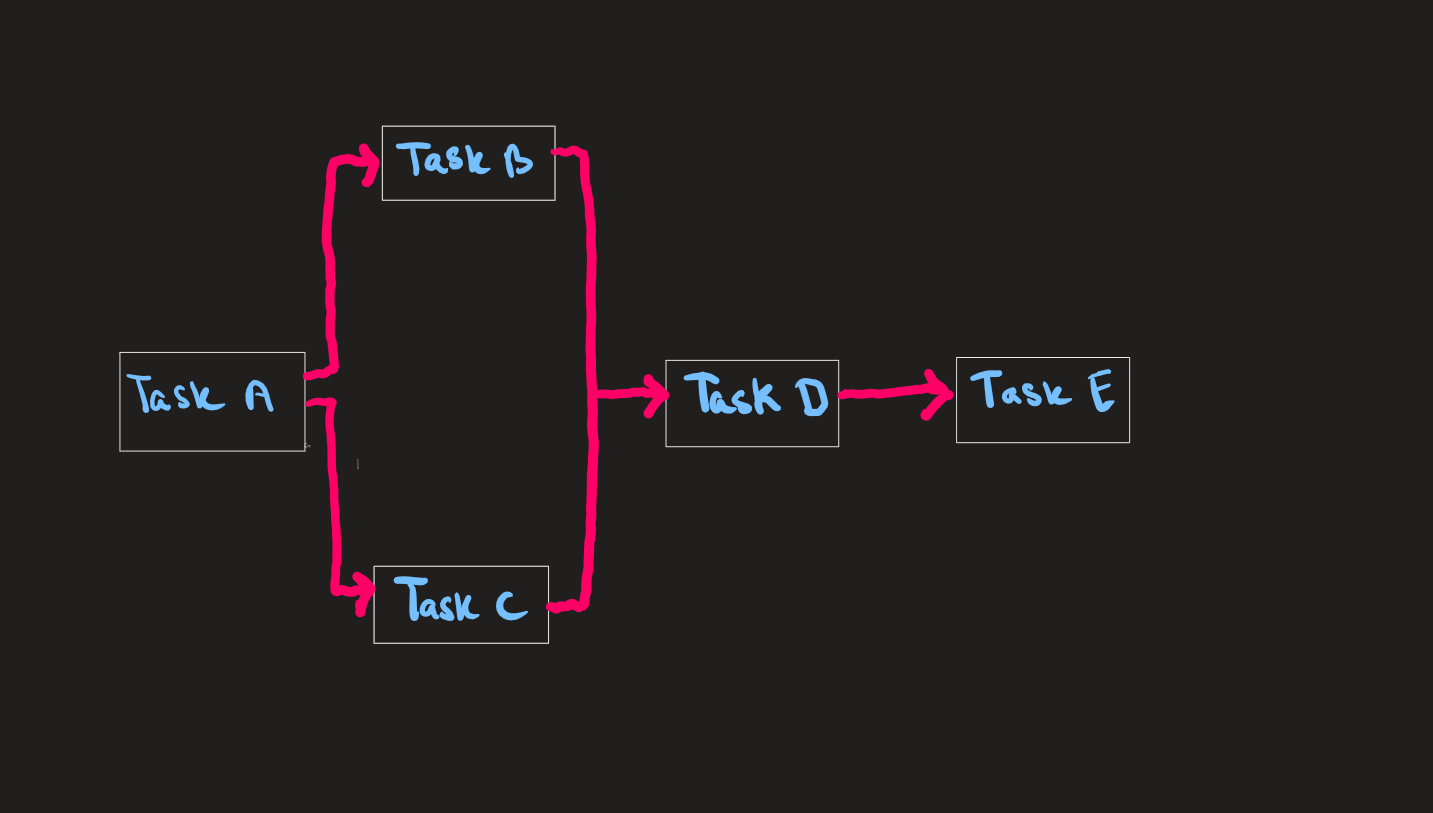
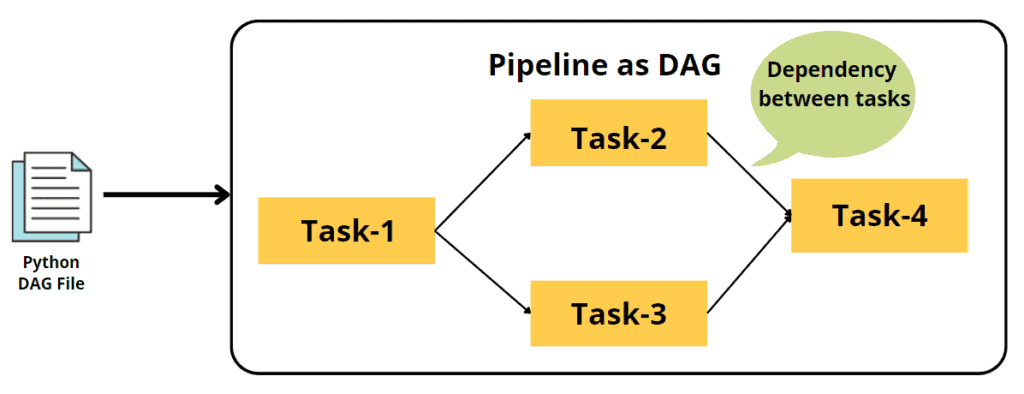
You can think of a DAG as a blueprint for your workfDAG, or directed acyclic graph, is a way to organize and represent tasks in Airflow. It’s made up of a series of tasks, represented by operators, that are connected to each other in a specific order. The tasks in a DAG are organized so there are no loops, making it an “acyclic” graph. When you run a DAG, Airflow will execute the tasks in the order they are connected. For example, if task A needs to be run before task B, you would connect task A to task B in the DAG. Then, when you run the DAG, task A will be executed first, followed by task B. The arrow shows that Task B and Task C will start parallelly after Task A is completed, and then task D is followed by Task E.
In the above picture, each task is an operator. Some operators of Apache Airflow are-
- PythonOperator — runs a python code
- BashOperator — runs bash scripts
- PostgresOperator — runs SQL queries to a PostgreSQL database
- EmailOperator — sends emails
The full list of operators is here: https://airflow.apache.org/docs/apache-airflow/stable/_api/airflow/operators/index.html. For example, a DAG would be tasks such as data extraction, cleaning, preprocessing, training, deployment, and monitoring in machine learning.
Step-by-Step Guide
Install Airflow
The first step in using Airflow is to install it on your machine. Airflow can be installed using pip, which is a package manager for Python. To install Airflow, you must install Python and pip on your machine. Once you have these, you can run the following command to install Airflow:
pip install apache-airflow
Initialize the Airflow Database
Once Airflow is installed, you can initialize the database by running the following command:
airflow initdb
“airflow initdb” is a command that sets up the database for Airflow. It creates the necessary folders to store information about the tasks and workflows or DAG. This command should be run once before using Airflow; it helps the tool to know where to store the information it will collect and track.
Create a DAG
To define the tasks in Airflow, you’ll need to create a Python file called a DAG (Directed Acyclic Graph) and define your tasks using Python functions. Each task is defined using the “PythonOperator,” which allows you to run a Python function as a task.
Here’s an example of how you might create a DAG for machine-learning tasks in Airflow:
from airflow import DAG
from airflow.operators.python_operator import PythonOperator
from datetime import datetime, timedelta
# Define default_args dictionary to pass to the DAG
default_args = { 'owner': 'me', 'start_date': datetime(2022, 1, 1), 'depends_on_past': False, 'retries': 1, 'retry_delay': timedelta(minutes=5)
}
# Instantiate a DAG
dag = DAG( 'machine_learning_pipeline', default_args=default_args, schedule_interval=timedelta(days=1) # Run the pipeline every day
)
# Define a task for data preprocessing
def data_preprocessing(): # Your code for data preprocessing goes here pass
data_preprocessing_task = PythonOperator( task_id='data_preprocessing', python_callable=data_preprocessing, dag=dag
)
# Define a task for training
def training(): # Your code for training goes here pass
training_task = PythonOperator( task_id='training', python_callable=training, dag=dag
)
# Define a task for deployment
def deployment(): # Your code for deployment goes here pass
deployment_task = PythonOperator( task_id='deployment', python_callable=deployment, dag=dag
)
In the above code example, we create a pipeline for machine learning tasks using Airflow. This pipeline includes three tasks: data preprocessing, training, and deployment.
First, we import the necessary modules from Airflow. The “DAG” class creates a pipeline, and “PythonOperator” defines a task as a python function. We also import “datetime” and “timedelta” classes that are used to set the schedule interval and the start date of the pipeline.
Next, we define some default settings for the pipeline by creating a dictionary called “default_args.” This dictionary includes settings such as the person responsible for the pipeline, the start date and the schedule interval for the pipeline to run, the number of retries, and the retry delay in case of failures. The “start_date” is set to the current date, the “depends_on_past” is set to “False,” which means that the pipeline does not depend on the previous runs, and the “schedule_interval” is set to “time_delta(days=1)”, which means that the pipeline will run every day.
After that, we create an instance of the DAG class, which is the main container for our pipeline. We pass it a name, “machine_learning_pipeline,” and we set the default settings and the schedule interval we defined earlier.
Then, we define each of the three tasks using the PythonOperator class. This class allows us to run a Python function as a task. Each task is defined with a unique task_id and a reference to the DAG. The “data_preprocessing” task takes no input and returns no output; it simply preprocesses the data. The “training” task takes the preprocessed data as input, trains a model, and returns the trained model. The “deployment” task takes the trained model as input and deploys it.
Finally, we set the order of the tasks using the set_upstream method so that the data preprocessing task runs first, followed by the training task and then the deployment task. This way, Airflow knows in which order the tasks should be executed.
Set Up the Dependencies Between Tasks
# Set the order of the tasks
training_task.set_upstream(data_preprocessing_task)
deployment_task.set_upstream(training_task)
By calling the “set_upstream” method on each task, we specify that the “training” task should be executed only after the “data_preprocessing” task is completed, and the “deployment” task should be executed only after the “training” task is completed.
This is a basic example of using Airflow to create a pipeline for machine learning tasks. You can add more tasks and functionalities based on your requirements and use Airflow’s web UI to monitor and manage the pipeline. You can also add triggers and set up the email notification and other functionalities provided by Airflow to make the pipeline robust and manageable.
Running the Pipeline
After setting up the dependencies asks, the next step would be to start running the pipeline. To start a pipeline, you can use the “airflow run” command, followed by the name of the DAG and the task name.
airflow run machine_learning_pipeline data_preprocessing
This command will trigger the execution of the “data_preprocessing” task, and subsequently, the “training” and “deployment” tasks will be executed as they are dependent on the “data_preprocessing” task.
Start the Airflow Webserver
As the pipeline runs, you can monitor its progress using the Airflow web UI. This can be accessed by running
airflow webserver
In the Airflow web UI, you can see a list of your DAGs and each task’s status. You can also see the logs for each task, which can be helpful for troubleshooting.
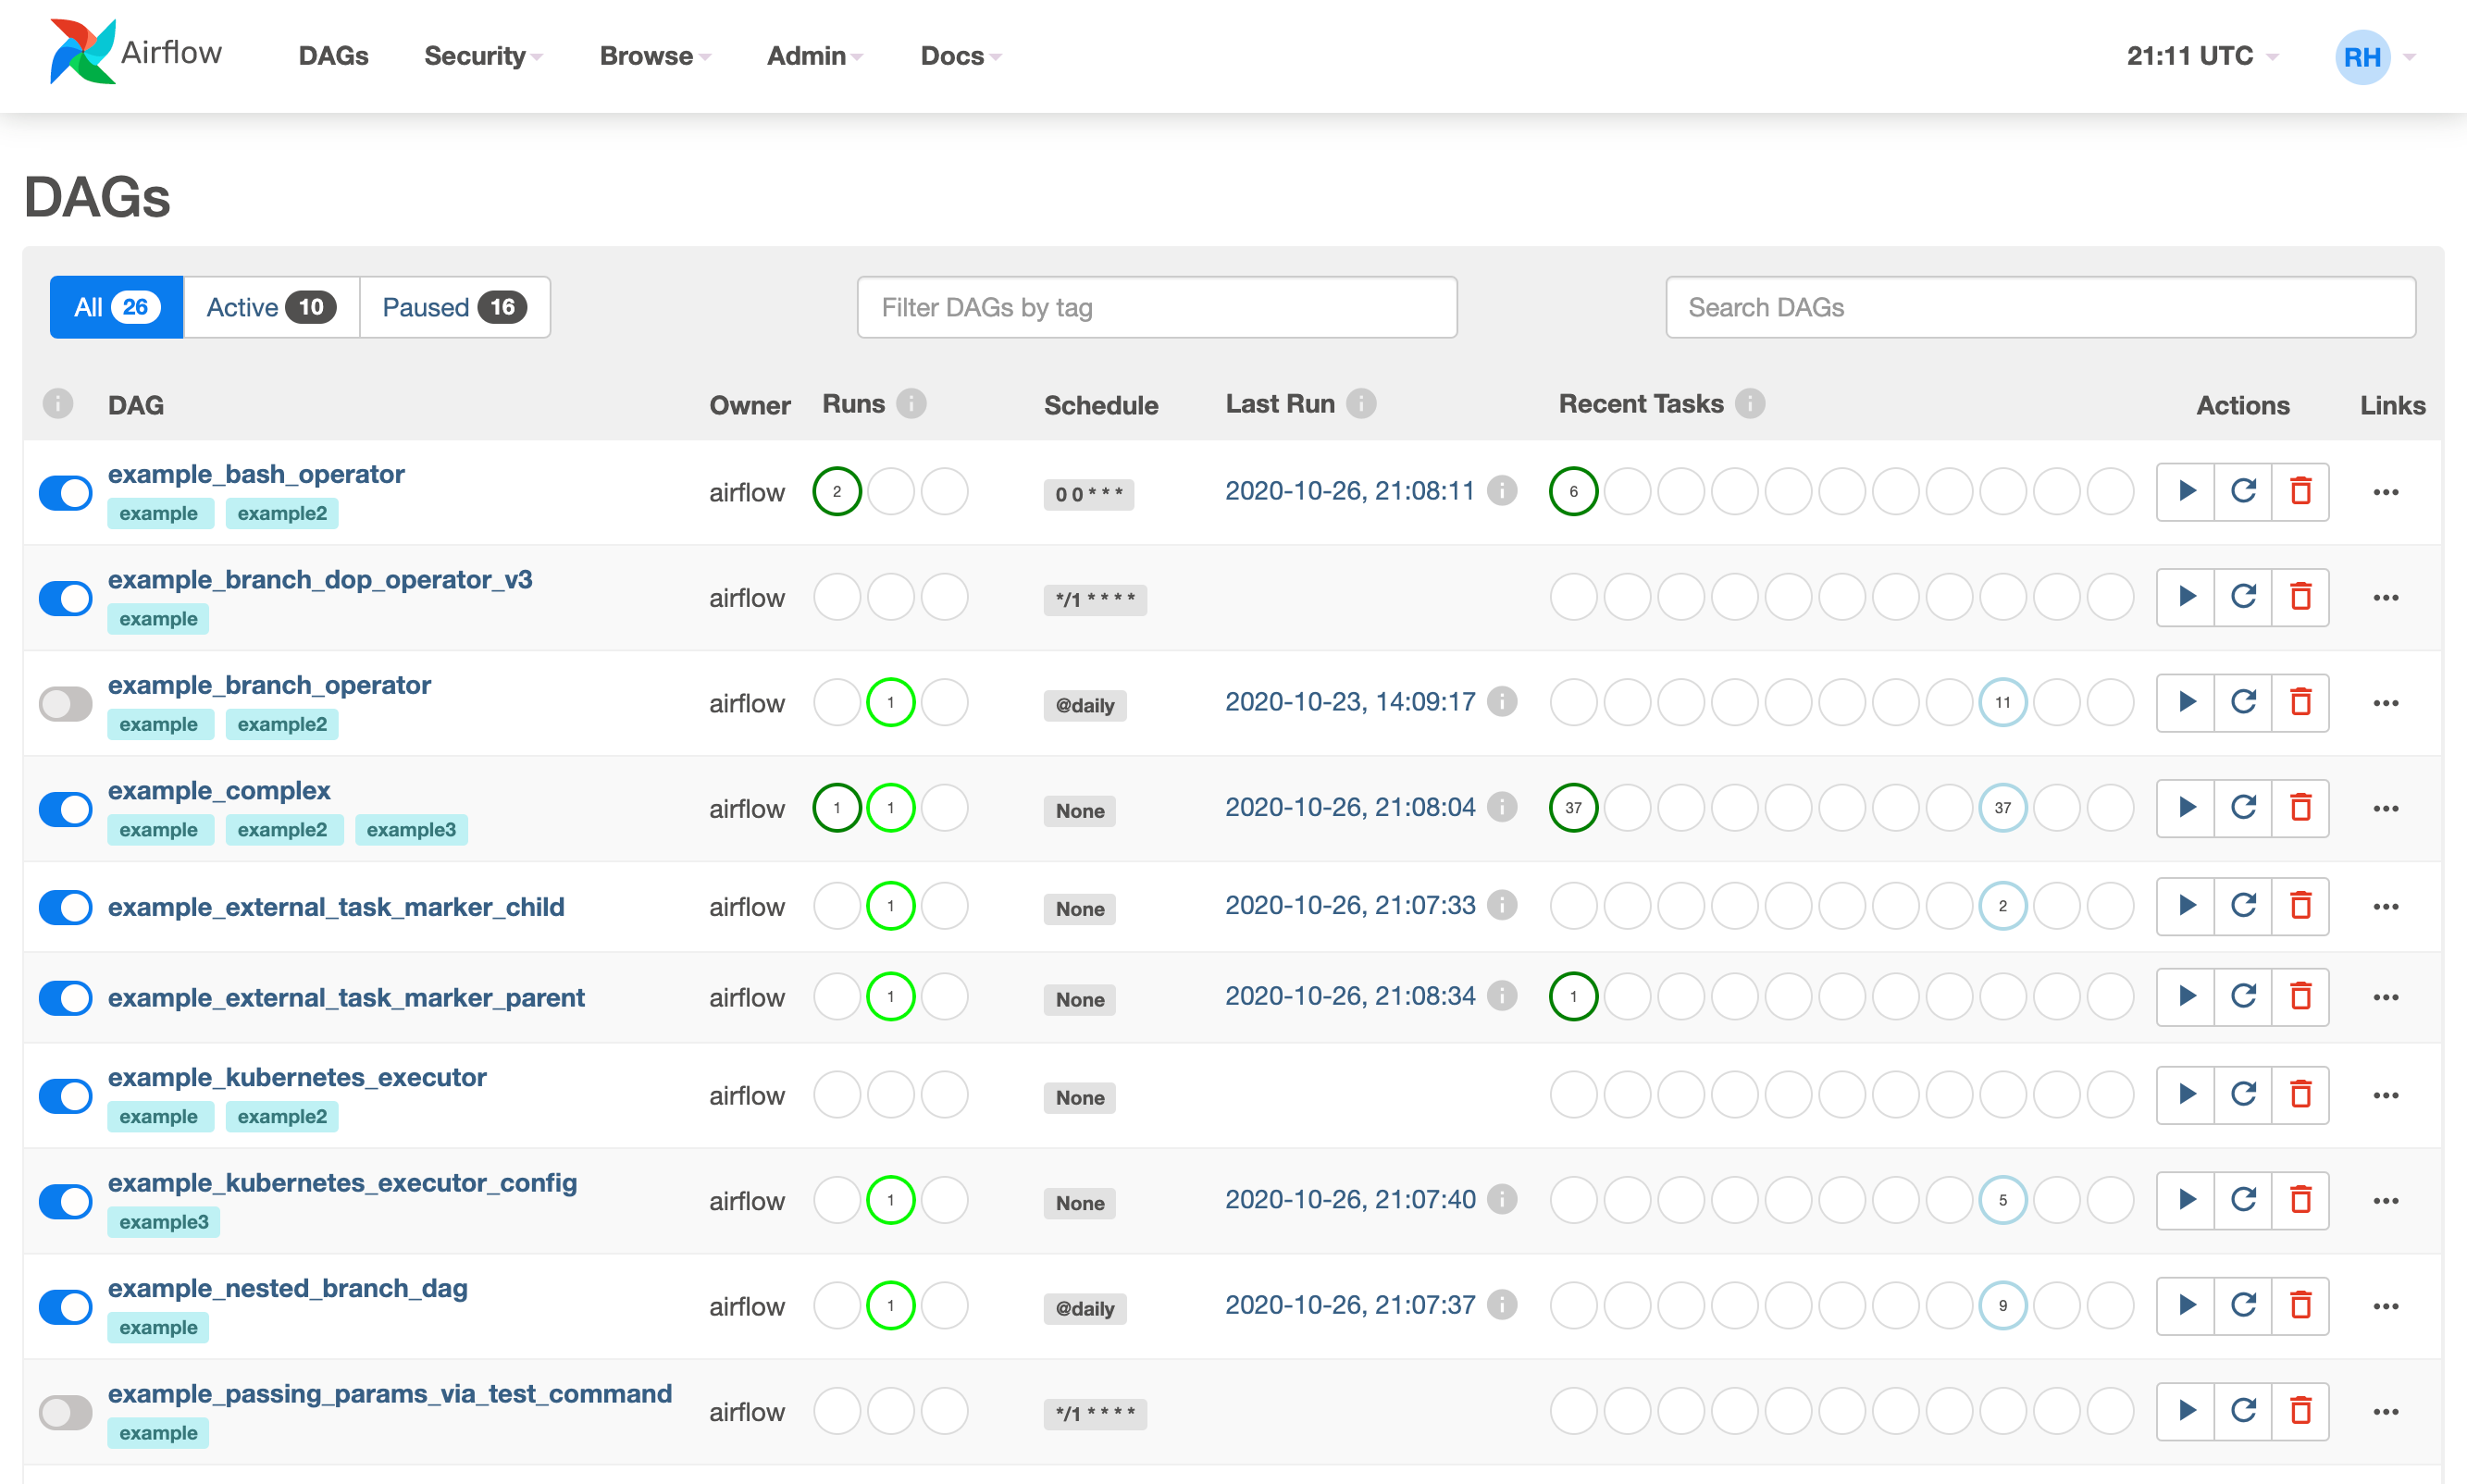
Additionally, you can also schedule your pipeline to run automatically at specific times or trigger it to run based on an external event, such as when a new file is added to a specific folder. This can save you the hassle of manually triggering the pipeline every time and ensure that the pipeline runs even if you are not around.
Airflow Notifications – Keeping an Eye on Your Pipelines
Airflow notifications are a cool feature that lets you know what’s happening with your pipelines. You can set them up to get updates on your pipeline’s status and even receive notifications when something goes wrong. This way, you can quickly fix any issues that come up. These notifications can be sent through different ways such as email, slack, or custom webhooks
Why do we Need notifications?
Notifications help with debugging. They keep you informed about what’s happening with your pipeline, so you can quickly find and fix any problems.
Notification Levels
Airflow has three different levels of notifications: success, failure, and retry. Success notifications are sent when a task is completed without any issues, failure notifications are sent when a task doesn’t work as expected and retry notifications are sent when a task is being retried.
Notification Triggers
Airflow has a built-in trigger system that lets you set up notifications based on different conditions. For example, you can set up a notification to be sent when a task takes too long to complete or when a task fails.
Custom Notifications
Airflow also allows you to create custom notifications. For example, you can create a notification that sends a message to a slack channel or your email. You can set up these custom notifications to be sent when certain conditions are met.
Airflow Notifications: The Key to a Smooth Workflow
Airflow notifications are a great way to stay informed about what’s happening with your pipelines. There are different ways to send notifications, such as email or slack. This section will look at two popular methods: email and slack notifications.
Email Notifications

Email notifications are a great way to get updates on your Airflow tasks, especially when something goes wrong. To set up email notifications, you must configure your SMTP (Simple Mail Transfer Protocol) settings in the Airflow configuration file. This typically includes your email address, server address, and login credentials.
Once you’ve set up your SMTP settings, you can use the “email_opearator” to send an email when a certain event occurs. Here’s an example of how you might use the “email_opearator” to send an email when a task fails:
from airflow.operators.email_operator import EmailOperator
task_fail_email = EmailOperator( task_id='send_failure_email', to='[email protected]', subject='Airflow task failed', html_content='Task {{ task_instance.task_id }} failed', trigger_rule='one_failed', dag=dag)
task >> task_fail_email
In this example, the “task_fail_email” operator is set up to send an email to your email address when the preceding task, “task,” fails. The “to” field is set to your email address, the “subject” field is set to “Airflow task failed,” and the “html_contrent” field is set to include the failed task’s ID. The “trigger_rule” is set to “one_failed, ” meaning the email will be sent when one task fails. The operator is also connected to the dag so that it can run when the dag runs.
It’s also possible to send an email when a task completes successfully or on a specific schedule. You can find more information on how to configure the email operator in the Airflow Documentation: https://airflow.apache.org/docs/apache-airflow/stable/howto/email-config.html
Slack Notifications

Slack notifications are another great way to get updates on your Airflow tasks. To set up Slack notifications, you must create an incoming webhook in your Slack workspace. This will give you a unique URL that you can use to send messages to a specific channel in your workspace.
Once you have your incoming webhook URL, you can use the “SlackWebhookOperator” to send a message to a Slack channel when a certain event occurs. Here’s an example of how you might use the “SlackWebhookOperator” to send a message to a Slack channel when a task fails:
from airflow.contrib.operators.slack_webhook_operator import SlackWebhookOperator
task_fail_slack = SlackWebhookOperator( task_id='send_failure_slack', http_conn_id='slack', webhook_token=SLACK_WEBHOOK_TOKEN, message='Task {{ task_instance.task_id }} failed', trigger_rule='one_failed', dag=dag)
task >> task_fail_slack
In this example, we’re setting up a Slack notification to send a message to a specific channel in our Slack workspace when a task fails. We’re using the “SlackWebhookOperator” to do this. We’ve given the notification the task_id of ‘send_failure_slack’ and specified that it should use the connection named ‘slack’ that we set up earlier. We’ve also provided the incoming webhook token that we generated and specified that the message should include the ID of the failed task. Finally, we’ve set the trigger rule to ‘one_failed,’ meaning the message will be sent only when one task fails. The operator is also connected to the dag so that it can run when the dag runs.
It’s also possible to send a message when a task completes successfully or on a specific schedule. You can find more information on how to configure the Slack operator in the Airflow Documentation:
https://airflow.apache.org/docs/apache-airflow-providers-slack/stable/_api/airflow/providers/slack/operators/slack/index.html
Airflow SLAs: Staying on Track and Meeting Commitments
Airflow allows us to set Service Level Agreements (SLAs) for our tasks and workflows. An SLA is a set of rules that a task or workflow must follow, and if it fails to meet the SLA, we will be notified. This way, we can ensure our machine-learning tasks are running well and fix any issues that may arise.
To set up an SLA in Airflow, we use the “sla” parameter when creating a task. For example, if we want to set an SLA of 2 hours for a task named “my_task,” we would write:
my_task = BashOperator( task_id='my_task', bash_command='echo "Hello World"', sla=timedelta(hours=2), dag=dag
)
This sets the sla of the task “my_task” to 2 hours. When creating the DAG, we can also set SLAs for the entire DAG by using the “sla_miss_callback” parameter. This parameter takes a function that will be called when the DAG’s SLA is not met. This way, we can be alerted if any issues arise and fix them in a timely manner.
Conclusion
In the end, we can say that it is a great tool that can help us take care of our machine-learning tasks and make them run smoothly. We learned how to set up our tasks and make them depend on each other, schedule them, set SLA, and get notifications when something goes wrong. By reading this guide, you should now understand how to use it for your machine-learning tasks. It is a powerful tool that can save time and make your work more efficient, so don’t be afraid to try it out. Here are some of the key takeaways from my article:
Key Takeaways
- It is a powerful tool for managing and scheduling machine-learning tasks.
- Creating a DAG is the first step for machine learning tasks.
- Notifications and SLAs are essential for monitoring and troubleshooting machine learning tasks.
- Email and Slack are popular methods for receiving notifications.
- Customizing notifications and SLAs to fit your specific use case is easy.
- Building a monitoring and alerting system from scratch using Airflow’s notification and SLA features can increase the efficiency and reliability of your machine-learning pipeline.
Resources
The Airflow documentation: The official documentation https://airflow.apache.org/docs/apache-airflow/stable/index.html is a comprehensive resource that covers all aspects from installation to advanced usage. It’s a great starting point for learning about the basics of Airflow.
The media shown in this article is not owned by Analytics Vidhya and is used at the Author’s discretion.
Related
- SEO Powered Content & PR Distribution. Get Amplified Today.
- Platoblockchain. Web3 Metaverse Intelligence. Knowledge Amplified. Access Here.
- Source: https://www.analyticsvidhya.com/blog/2023/02/monitoring-and-alerting-system-using-airflow/